Category Archives: Linux

Use SCP to copy files between remote and local hosts

So you need to copy a file you have on a remote server locally, or send a local file to a remote server? Fortunatally, it’s pretty easy with scp. Here’s an example to copy a remote server to the local machine.

scp -P 65124 remoteuser@remotehost:/var/lib/path/to/file.txt /var/lib/path/to/

…which will connect to “remotehost” on port 65124 as “remoteuser” and copy the /var/lib/path/to/file.txt on “remotehost” to the local /var/lib/path/to/ directory.

Need to copy a local file to a remote host? Just switch the parameters up!

scp -P 65124 /var/lib/path/to/file.txt remoteuser@remotehost:/var/lib/path/to/
Please remember to subscribe to the newsletter to stay up to date!

You or someone you know looking to buy or sell?
Disclaimer: Thoughts and opinions are my own, and do not reflect the views of any employer, family member, friend, or anyone else. Some links may be affiliate links, but I don't link to anything I don't use myself. You would think this should be self evident these days, but apparently not...

Set a proxy and carry over the values to sudo

If you’ve ever been behind an enterprise proxy server and needed to reach things on the outside, you probably know how frustrating it is to try and just use your normal commands for something as simple as a wget. So, to get started you will need to know the URL and port for your proxy server, but once you have that, start by editing your .bashrc and add the following (setting proxyhost, the port, and adjusting “no_proxy” as appropriate)…

function proxyon(){
     echo -n "password (for proxy): "
     read -es password
     export http_proxy="http://$USER:[email protected]:8181/"
     export HTTP_PROXY=$http_proxy
     export https_proxy=$http_proxy
     export HTTPS_PROXY=$http_proxy
     export ftp_proxy=$http_proxy
     export rsync_proxy=$http_proxy
     export no_proxy="localhost,127.0.0.1,localaddress,.localdomain.com,.domain.com"
     echo -e "\nProxy environment variable set."
}
function proxyoff(){
     unset HTTP_PROXY
     unset http_proxy
     unset HTTPS_PROXY
     unset https_proxy
     unset FTP_PROXY
     unset ftp_proxy
     unset RSYNC_PROXY
     unset rsync_proxy
     echo -e "\nProxy environment variable removed."
}

# remove next line if you don't want to set proxy automatically on login
proxyon

Now you can turn your proxy on and off with the “proxyon” and “proxyoff” commands, but that doesn’t help you when you try to install something with yum or apt that requires sudo. To carry over the proxy values, you’ll need to “sudo visudo” and add the “Defaults” line like shown below…

###############################################
# DO NOT ADD ANYTHING FROM HERE TO END OF FILE #
#
#includedir   /etc/sudoers.d
#
# DO NOT ADD ANYTHING ABOVE THIS LINE###########
Defaults env_keep = "http_proxy https_proxy HTTP_PROXY HTTPS_PROXY ftp_proxy"

… and now, hopefully you are all set.

Please remember to subscribe to the newsletter to stay up to date!

You or someone you know looking to buy or sell?
Disclaimer: Thoughts and opinions are my own, and do not reflect the views of any employer, family member, friend, or anyone else. Some links may be affiliate links, but I don't link to anything I don't use myself. You would think this should be self evident these days, but apparently not...

Configure a Static IP in Ubuntu 18.04

As with all things Linux there’s a million ways to do things, and every brilliant release comes up with a new way to do the same old things in a “better” way. Can you tell I’m be sarcastic yet? Good.

Anyway, after spending over an hour trying to get a freakin static IP on my desktop box I thought I’d share in case it saved anyone hours of their life.

My simple goal was to provide a static IP. Nothing more. Nothing less. Well, the “better” way of doing it now appears to be with “netplan”, and unless you enjoy banging your head against the wall, just create/edit this file and replace with the network interface (enp3s1), IP (192.168.20.55) and gateway (192.168.20.1) of your choice (this config appears to use the DNS servers from the router w/ DHCP turned on). Oh yeah, and don’t bother with the GUI based configuration tool, because apparently they’re not connected at all, and using this will force the config from this file (you’ve been warned and saved hours)

sudo nano /etc/netplan/01-networkd.yaml

# this is the actual file content
network:
  version: 2
  renderer: networkd
  ethernets:
    enp3s1:
      dhcp: no
      addresses: [192.168.20.55/24]
      gateway4: 192.168.20.1
Please remember to subscribe to the newsletter to stay up to date!

You or someone you know looking to buy or sell?
Disclaimer: Thoughts and opinions are my own, and do not reflect the views of any employer, family member, friend, or anyone else. Some links may be affiliate links, but I don't link to anything I don't use myself. You would think this should be self evident these days, but apparently not...

Using sed to view and replace text on a specific file in Linux

Ever need to replace very specific text on a particular line in a very large file on Linux? Enter the sed command.

To view the line (let’s say line 864 in this case) in the specific file, issue this command…

$ sed -n '864'p myfile.txt

And let’s say you get back the string ” I hate cheese”. Since we all know that’s not true, you can use a different variation of the sed command to replace “hate” with “love” like so…

$ sed -i '864s/hate/love/' myfile.txt

And if you’re really curious on how this even came about, it was due to an error in the phpMyAdmin export.php script when you had to change “break 2” to “break” on line 846 as identified here: https://askubuntu.com/questions/928883/500-error-on-phpmyadmin-export-on-phpmyadmin-export-php/930975Please remember to subscribe to the newsletter to stay up to date!

You or someone you know looking to buy or sell?

Disclaimer: Thoughts and opinions are my own, and do not reflect the views of any employer, family member, friend, or anyone else. Some links may be affiliate links, but I don't link to anything I don't use myself. You would think this should be self evident these days, but apparently not...

Linux Startup Email

Want to receive an email any time your linux server reboots? Just create this script…

sudo nano /usr/local/sbin/startupemail.sh

Here’s the code for the script…

#!/bin/sh

# Lets things startup
sleep 60

# Get info
IP="$(ifconfig | grep -A 1 'eth0' | tail -1 | cut -d ':' -f 2 | cut -d ' ' -f 1)"
HOSTNAME=`hostname`

#Send email
echo "IP: $IP, Host: $HOSTNAME" | mail -s "Server Started" [email protected]

Make sure to make it executable…

sudo chmod u+x /usr/local/sbin/startupemail.sh

Then add it to your /etc/rc.local filePlease remember to subscribe to the newsletter to stay up to date!

You or someone you know looking to buy or sell?

Disclaimer: Thoughts and opinions are my own, and do not reflect the views of any employer, family member, friend, or anyone else. Some links may be affiliate links, but I don't link to anything I don't use myself. You would think this should be self evident these days, but apparently not...

OwnCloud webapp not reflecting true list of files

If you’re using OwnCloud and have a process whereby your add or remove files from directories via some sort of server process, you may find that you need to force OwnCloud to update/rescan the file listing. To do so you can manually run the following command…

sudo -u username php /path/to/owncloud/console.php files:scan --all

You may also want to consider adding it to the crontab for “username” on a daily basis.

Thanks to this site for pointing me in the right direction.Please remember to subscribe to the newsletter to stay up to date!

You or someone you know looking to buy or sell?

Disclaimer: Thoughts and opinions are my own, and do not reflect the views of any employer, family member, friend, or anyone else. Some links may be affiliate links, but I don't link to anything I don't use myself. You would think this should be self evident these days, but apparently not...

Sendmail isn’t sending to domain.com : Linux

Say you’re using sendmail to relay email on a web server that you own that’s named “domain.com”, and email is being delivered fine to any domain except domain.com. What could be the problem?

  1. Rename your server. No server should be named with an actual domain name.
  2. Change /etc/hostname to the new name for your server
  3. Update /etc/hosts to remove the domain name and replace with the new hostname
  4. Remove the domain name from /etc/mail/local-host-names
  5. Restart sendmail “sudo service sendmail restart”
  6. Restart your server “sudo reboot”

Once you’ve done that test sendmail out like so…

echo "command line test" | mail -s "Sendmail test" [email protected]

Please remember to subscribe to the newsletter to stay up to date!

You or someone you know looking to buy or sell?

Disclaimer: Thoughts and opinions are my own, and do not reflect the views of any employer, family member, friend, or anyone else. Some links may be affiliate links, but I don't link to anything I don't use myself. You would think this should be self evident these days, but apparently not...

Improved Linux command history

With four lines setup one time you can type the beginning of a command (ex: “ls”) then press the up and down arrows to see the most recent commands containing the text you typed (ex: “ls ~/scripts”) making it much easier to find what you’re looking for. To make this happen, create a text file called .inputrc in your home folder and put the following four lines inside:

"\e[A": history-search-backward
"\e[B": history-search-forward
set show-all-if-ambiguous on
set completion-ignore-case on

Please remember to subscribe to the newsletter to stay up to date!

You or someone you know looking to buy or sell?

Disclaimer: Thoughts and opinions are my own, and do not reflect the views of any employer, family member, friend, or anyone else. Some links may be affiliate links, but I don't link to anything I don't use myself. You would think this should be self evident these days, but apparently not...

Linux ls output colors

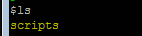
If you’ve used linux much and your terminal is set to display files and directories in color, you know how frustrating it can be to have dark blue text on a black background like so (I’ve seen it much worse too)…

dirColorBefore

If you would like to modify the output so the colors are a bit more readable, you can add the following to your .bashrc file…

alias ls='ls --color'
LS_COLORS='di=33:fi=36:ex=31'
export LS_COLORS

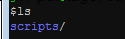
which will produce an easier to read version like so (with directories yellow, files a crayon/teal, and executable files red)…

dirColorAfter

As pointed out in this article

The first line makes ls use the –color parameter by default, which tells ls to display files in different colours based on the setting of the LS_COLORS variable.

The second line is the tricky one, and what I have worked out so far has been by trial and error. The parameters (di, fi, etc.) refer to different Linux file types. I have worked them out as shown

di = directory
fi = file
ln = symbolic link
pi = fifo file
so = socket file
bd = block (buffered) special file
cd = character (unbuffered) special file
or = symbolic link pointing to a non-existent file (orphan)
mi = non-existent file pointed to by a symbolic link (visible when you type ls -l)
ex = file which is executable (ie. has ‘x’ set in permissions).

The *.rpm=90 parameter at the end tells ls to display any files ending in .rpm in the specified colour, in this case colour 90 (dark grey). This can be applied to any types of files (eg. you could use ‘*.png=35’ to make jpeg files appear purple.) As many or as few parameters as you like can go into the LS_COLORS variable, as long as the parameters are separated by colons.

Using trial and error (and a little bash script I wrote… my first one ever! 🙂 I worked out all the colour codes, at least my interpretation of them –

0 = default colour
1 = bold
4 = underlined
5 = flashing text
7 = reverse field
31 = red
32 = green
33 = orange
34 = blue
35 = purple
36 = cyan
37 = grey
40 = black background
41 = red background
42 = green background
43 = orange background
44 = blue background
45 = purple background
46 = cyan background
47 = grey background
90 = dark grey
91 = light red
92 = light green
93 = yellow
94 = light blue
95 = light purple
96 = turquoise
100 = dark grey background
101 = light red background
102 = light green background
103 = yellow background
104 = light blue background
105 = light purple background
106 = turquoise backgroundPlease remember to subscribe to the newsletter to stay up to date!

You or someone you know looking to buy or sell?

Disclaimer: Thoughts and opinions are my own, and do not reflect the views of any employer, family member, friend, or anyone else. Some links may be affiliate links, but I don't link to anything I don't use myself. You would think this should be self evident these days, but apparently not...

Pass a Command Line Argument to an Alias

Ever want to pass in a command line argument to an alias? You would think you could just do it with $1, but actually you have to create a function and then call that function. So, for instance if you want to pass a portion of a log file name, you could set your alias like this…

alias catlog='function _catIt() { cat /var/logs/$1.log; };_catIt'

then, when you want to see the XX00D log, you just call your alias like so…

catlog XX00D

Please remember to subscribe to the newsletter to stay up to date!

You or someone you know looking to buy or sell?

Disclaimer: Thoughts and opinions are my own, and do not reflect the views of any employer, family member, friend, or anyone else. Some links may be affiliate links, but I don't link to anything I don't use myself. You would think this should be self evident these days, but apparently not...